Tuesday, October 31, 2017

Anything but Scary-Halloween Inspired Design with Year Round Appeal

Happy Halloween! It's that time of year when you try not to eat all the candy before the kids trick or treat.

After Christmas, Halloween is the second most favorite time for decorating our homes.  Check out Pinterest and you will easily see how much we love pumpkins, witch's hats, ghosts, black cats, ravens and skulls. 


For a month, it's fun to embrace the macabre but could you live with this year round? For example this  might work if you make a lot of pies or keep a goat in your bedroom.


The traditional palette of  bright orange and black may be difficult for most people to embrace on a daily basis-unless you are an Oklahoma State fan....or my Dad (the unofficial Earl of Orange).

Go Pokes....This is for you Pops


When we tease out a literal interpretation of Halloween, there are several elements of the holiday left to create inspired interiors.  Let's take a peek at a few:

Bold Black  The classic color of Halloween, black is a sophisticated and timeless favorite in interior design.


Above is Black Crackle from Faux Effects used on cabinetry.  What makes this crackle look more refined?  As the black crackle medium is drying, I rub off areas with a damp cloth to reveal the warm wood tone underneath. When the crackle medium is dry,  I brush on Old World Finishing Paint in Coal. This will back fill and soften the crackle.  When the Finishing Paint is dry, I sand the surface to see the wood and to create a really smooth finish. By doing this step I may control how the crackle looks and feels!


This door also uses crackle but the medium is Faux Effects' Clear Crackle mixed with Setcoat Metallic Gun Metal.  Don't want to use crackle but get the rich look of Metallic Black?


Metallic Black Setcoat is a great choice for color and coverage.  The door above has small dabs of Black Onyx Venetian Plaster to add interest and a bot of texture.

Black is also a classic for wall finishing.  This close-up of a feature wall is RS Plaster painted with Metallic Black Setcoat: RS Water Wax is mixed with Faux Effects Silver Mica Powder and troweled over the plaster. I use a buffer brush on a drill to polish.  A glaze of FX Thinner + Van Dyke Brown  Stain & Seal + Ebony Stain & Seal is brushed over the surface to highlight the texture. 

Gothic Pattern A mix of dark and romantic, this style is a way to add drama (both small and large) to your home. 

My Dorian Finish below uses Black Onyx Venetian Gem Plaster as a base (heads-up, Venetian Plaster is the Faux Effects November Sale Product).  The Venetian Gem is shaped with a specialty roller.  Then I apply Foil size. After this sets, but is not dry, I place a romantic scroll stencil from Cutting Edge on top. The size holds the pattern. I mix Clear crackle with glitter (I used Silver here) and trowel it over the pattern,  When the crackle dries, I used pewter foil around the pattern.  The same glaze mix of Van Dyke and Ebony Stain & Seal is used over the surface.


This beautiful and romantic kitchen is by talented Kansas City Artist Suzanne Lynch, owner of Finishes Unique.  Black Setcoat is the base. Suzanne used Black Palette Deco over the Damask Pattern from Royal Design Studio. Stove Pipe Nu'Villa or Black Onyx Venetian Gem are also choices.  She used Sandstone to bury the pattern and lighten the finish. A warm glaze softens the wall.  Love the crystal chandelier as well! 


Black is not the only choice for a Gothic inspired finish. Deep blue and grey are also choices.
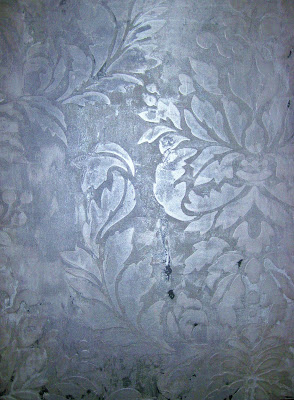
One of my favorite colors is Ancient Grey Lusterstone. Ancient Grey Lusterstone is used as the base and for the pattern from Cutting Edge in this simple and elegant sample.


My McQueen finish starts with Weathered Bronze Lusterstone.  What makes this finish is the combination of patterns ( the larger one is the same as Suzanne's choice, Fabric Damask from Royal Design Studio). I used Turquoise Stain & Seal for the smaller pattern and Weathered Bronze and Mica Powders for the larger pattern. 


Burnt Orange. Halloween orange is a bit bright-best saved for hunting vests and traffic cones...and my dad.   But when shaded in warm copper, red or dark brown, orange may be a lovely addition to your interiors.

Not all little girls want pink.  This children's table and chairs combine Gothic Style with Burnt Orange. The finish is Black Setcoat and Fire Red Setcoat. The pattern is from Royal Design Studios.


One of my most popular finishes is the Vintage Apricot for cabinets.  For this bathroom it pairs nicely with the Copper Foil behind the RS Sandstone Walls. 


Faux Effects Metallic Copper Fresco over a base of Royal Taupe Fresco.  The finish is glazed with Van Dyke Brown Stain & Seal for a simple cabinet finish with a lot of depth-that still feels smooth! 


Burnt Orange is not just for wood. It creates a dramatic and rich finish for walls as well.

Kansas City is home to some of the best finishers in the country. This copper wall treatment for a Butler's Kitchen is by local finisher, Sue Hon.


And this lush bath finish by Heather McDonald of  thestudiochick.com which was featured in Faux Effects World Magazine.


These are just a few ideas for using Halloween inspired elements for finishes. The next time you're considering something different, treat your clients to a bit of Gothic Romance, Black Drama or Rich Burnt Orange.  

And just a reminder-today is the last day for the 20% off sale of Faux Effects Stain & Seal.  Think of it as stocking your own goody bag.


Have a Safe & Happy Halloween! 

Rebecca


Monday, October 23, 2017

The Stain and Seal Colors You Need Now


Blue Monday never looked so happy!

I wanted to share with you today my favorite color palette of Stain & Seal.  When I tell people how much I use Colonial Green and Williamsburg Blue Stain and Seal Colors they look at me like I am a Puritan!  Well. let me tell you, Ye Ole Williamsburg Blue and Colonial Green colors are incredibly versatile and dare I say, current. The same with Turquoise and Teal Stain and Seal colors.  No 1980's eyeshadow shades-these two have a lovely grey undertone that takes them more to Scandinavia then Studio 54! And Pickling White should be a staple in your cabinet stains, Poor pickling got saddled with thoughts of  horrible cabinets that turned peachy or chartreuse with time.  Not this color.

Need convincing?  How about a whole house project built around these stain colors.

Beautiful blue, green and cream  French Country china cabinet
with Faux Effects Stain & Seal and Old World Finishing Paint.


One of my favorite clients owns a fabulous French country home. I went with all this palette of  Stain & Seal Colors when she needed an update from warm yellow and terracotta to a lovely up-to-date blue based scheme.

The china cabinet above is from France. Looks like an old antique right?  It's actually from the 1970's but with the right shades (and techniques) it fits in perfectly and naturally with older pieces from Provence.

An iron Jardinière in black grey before

Iron Jardinière after with Faux Effects Williamsburg Blue, Ebony and Pickling White Stain & Seal colors.


Look how nicely the Jardinière (that's what they call these cast iron garden pots) pulls out the blue in the modern art. That little piece is so heavy-moving it was harder than staining it.   


I mix my Stain & Seal with FX Thinner to make it flow better and to control the opacity.
We needed the mirror below to coordinate with the antique seltzer bottles. Turquoise and Teal Stain and Seal colors were a great match.  Plus now the hand-painted scene at the top of the mirror stands out more then it did when the piece was just grey.  

Antique mirror updated with Faux Effects Stain & Seal 


Over these colors, I tend to use a mix of 2 parts Vandyke Stain & Seal + 1 part Ebony Stain & Seal mixed with 3-4 parts FX Thinner. Why do I use this mix to age the blue and green based stain? Why thanks for asking!

If you use over-stains made with a gold base- like Rich Brown or a warmer brown like American Walnut, you will really pull out the green undertone of these blue/green stains. And Rich Brown or American Walnut on Pickling White may skew a bit pink.  Using something with a grey tone will soften the blue/greens and white without changing the color significantly.

Antique clock and thermometer with Williamsburg Blue Stain & Seal and Faux Metal in Rich Gold. All Faux Effects.


What time is it? Time to use some Williamsburg Blue Stain & Seal with Rich Gold Faux Metal to get an antique clock looking cool.... or is it hot?  OK. I just said that because this is also a thermometer. Maybe my poor attempt at humor is lame but the finish product is not.  The combination actually looks authentic which was the goal!


My homage to how much I use Pickling White Stain & Seal.  The fireplace was polished concrete in beige...beige!  Pickling White helped transform it to an old crusty stone. And the walls were Terracotta....now a white washed faux wood. 


Hey there! I'm painting on a mix of Dove Old World Finishing Paint mixed with Pickling White over old pine ceiling planks.  Yes, I usually look at what I am painting but you try taking a decent selfie on scaffold while holding a paint brush. I mix Pickling White with the Old World Finishing Paint because I like how it thickens the mix. Added bonus: the stain reduces some of the dust but you still keep the ability to sand to a really smooth finish.  It also makes this layer less absorbent if you decide to glaze on top.  


Bye dark brown and orange ceiling....hello soft aged blue and cream with antique glaze.

You may be thinking...well Rebecca this is really pretty (at least I hope you think so) but what if I need something more Bohemian?  I  would say "thank you" and "I got Bohemian too."


I found this old oak table for $30 dollars!  It just needed a cheerful update....


I love Duck Egg Blue. All Stain & Seal colors play nicely with Faux Crème Colors, Faux Colors and Faux Crème Color Concentrates!  I paired this table with my Copenhagen Blue finished chairs-more Williamsburg Blue Stain & Seal. The Copenhagen Blue finish is shown near the end of this post (I didn't use the foil layer on these chairs.)

But what about walls?  I showed you a faux white washed wood wall finish that used Pickling White Stain & Seal in a picture above. For our own home, my accent color is Teal and I needed that color for Lusterstone.  So I used Teal Stain & Seal to tint Frosted Denim Lusterstone (I wanted a grey based Lusterstone to start).


This Greyed Teal  pairs nicely with Brown Suede and Charred Gold Lusterstone Colors for this dining room finish.  


Our old kitchen (above) with Pickling White Stain & Seal on the cabinets, ceilings and walls.  I should get a business deduction every time I move into another house because I need a new home every 5 years just to re-do and photograph for this blog!

Want to try a recipe yourself?  This is my favorite French Grey Color:

2 cups FX Thinner + 1 cup Pickling White Stain & Seal + 1 TBSP Dark Brown Faux Crème Color Concentrate + 8tsp Williamsburg Blue Stain & Seal + 2tsp Earth Brown Faux Crème Color.


My mix makes a nice opaque stain color.  I brush it on with a soft brush and wipe it down with cheesecloth as it starts to matte in sheen. If I remove more French Grey then I may see the wood underneath.  I will use the Earth Brown Faux Crème Color + Picking White Stain & Seal to make an over-glaze. The  Dark Brown Faux Crème Color Concentrate is my favorite product to  tip and shade a piece. All of my colors are mixed with FX Thinner. A great way to use your colors for multiple steps and provide a strong binder.

Let's end with a few more cabinet inspirations!


Maison Blue


Urban Fern


Nantucket Blue Crackle

Copenhagen Blue


Winters gate

Cerused Barnwood


Excited to go Green?  Or Blue?  Or Pickled? October is the month to give one (or all a try)

Interested in learning how to use Faux Effects Products for Cabinetry?  Check out my classes Thursday, December 7th (Restoration Re-Stain) and Friday, December 8th (Re-stain Wood Cabinets).  These classes will be at our studio in Dallas, TX. You may check the class information on the FE Dallas Facebook Fan Page. I will also post upcoming classes from other FE studios and instructors on this blog and on the Faux Effects Facebook Fan Page. Everyone is working on their 2018 schedules!

Until next week....

Rebecca


Sunday, October 8, 2017

Fastest Faux Barnwood

Pickling White Stain & Seal 
Remember how I told you that Pickling White Stain & Seal is the color you need? It was just on Friday so....Well this is one way that I use Pickling White on my own home. 

Many of you know about our purchase of a fixer-upper on the fly when we down-sized. I literally found it on a web search, sent Bruce and the realtor to see it and buy it if it was OK.  Let's just say it have given me a lot of opportunities to experiment with my Faux Effects products!

These were the pantry doors:

Old bi-fold doors before 
Old slab bi-folds. Now I had a vison of a beautiful barn door. But my wallet had a vision of something else.  And it turned out I didn't have room for a barn door.  But hey, I'm creative so I grabbed a couple of things to make-over the doors.

Once I figured out how to get the doors down, I cleaned and sanded them. For a base, I rolled a coat of  Royal Taupe Setcoat.  For my "barn wood" I mixed 50% water with Faux Effects Sandstone and whipped it with an electric drill and paddle. You want it to look like a paste.


Faux Effects Sandstone whipped with water for a creamy paste


I trowel the Sandstone paste over the base colors for 100% coverage.
Whipped Faux Effects Sandstone for Faux Barn wood


Next, I used a wire brush to "score" the Sandstone in long strokes. This creates the grain.


You may also use a stiff Chip brush-if you have one of those....because all artists never have a crusty brush handy!


When the Sandstone is dry, I lightly sand to so the surface feels smooth.  For my first color layer, I mix a favorite Pecan stain using these Faux Effects' products:

1 quart of FX Thinner + 1/2 cup Pickling White Stain & Seal + 1/4 cup American Stain & Seal + 1 TBSP Rich Brown Stain & Seal.  American Walnut and Rich Brown are standard useful stain colors for many projects.


I always spray my surface-especially when it's an unsealed plaster- with water. Remember water is your friend-it's an advantage of using a water-based stain product like Stain & Seal.

When the Pecan color is dry, I roll Picking White Stain & Seal mixed with FX Thinner (1:1) and wipe it back with a damp cloth.

Faux Effects Pickling White Stain & Seal rolled for Barn wood.


I want to pop the tips of the stained Sandstone. This is where I get more aggressive with the sanding block. After wiping off the dust, I rolled 2 coats of Faux Effects Aquaguard waiting an hour between coats.


To make my doors look a little more upscale, I bought thin wood strips from the big box store.  I cut them to size for the top and bottom of each door. Remember if you have bi-fold doors you will need to cut 2 pieces for the top and 2 pieces for the bottom-so it opens. Things like this seem obvious until you do it...don't ask me how I know this.


I used liquid nails to hold the pieces because they are so light weight.

Now, you could stop here and it looks pretty good. But what artist or crafter wants to stop at "pretty good?" Are we not defined by our love of embellishments?

I had some fun tacks lying around. OK.  I have boxes labeled "DO-DADS" because I'm always buying stuff at flea markets. Don't judge because I know you do it too.

There you go. So much better with the decorative tacks.


All I needed is some fun handles. These look like old plumbing wheels.. I guess there is a technical term for them. I just thought they were cute and big!


And that's it! Up-dated bi-fold doors with a fun up-cycled look!

Want to try Pickling White yourself? Don't forget that Stain & Seal is the October Product of the Month.  You may contact your local or favorite Faux Effects Studio to order-plus they should have the other products such as Sandstone and Aquaguard used in this DIY story.

As always...thanks for reading Finishing Acts and your comments and messages. If you have ideas or questions for future posts please drop me an email at rebecca@fauxfx.com

Rebecca