Showing posts with label Metallic Plasters. Show all posts

Wednesday, November 15, 2017

Metallo Spazolatto: A Wonderful Venetian Gem Sample Worthy of It's Name


Look at this contemporary sample using Faux Effects Venetian Gem in Moonstone Grey which hits all the current design trend sweet spots: metallic, grey and horizontal/vertical lines.  It has an industrial look that is very hot for home and commercial interiors. But it also reminds me of an interesting take on wood the more I look at it-I love finishes like this!

So who are creators of this striking sample? This fab finish is brought to you by the talented duo of:

Martin Alan Hirsch, owner and director of The Faux Finish School (A division of Decorative Finishes Studio) located in Louisville, Kentucky

and

Morey Dunbar, Lead Instructor for The Faux Finish School.


For the Metallo Spazolatto Sample (which wins for best name) you will need the following Faux Effects Products:

Charcoal Setcoat
Moonstone Grey Venetian Gem Plaster
Aquawax
Metallic Concentrate in Silver and Rich Gold
Aquacreme Glaze Medium
Ebony Stain & Seal

And the following tools:

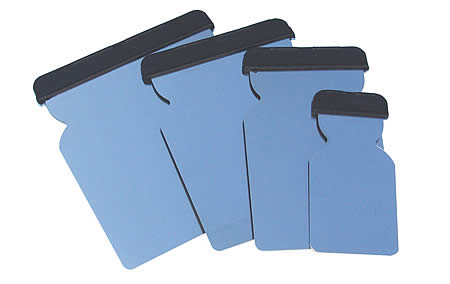
An Application Trowel and/or German Scrapers
A Bristle Linear Trowel 
12" Magic Trowel
Cheesecloth
Chip Brush
Roller head, roller handle and paint tray.

Step One:  Roll, brush or spray your base surface with 1-2 coats of the new Charcoal Grey Setcoat.
This layer should dry overnight.

Step Two:  Use a German Scraper to butter your application trowel with Moonstone Grey Venetian Gem Plaster.
The Moonstone Grey Plaster should be applied generously to the surface for approximately 100% coverage and 1/8" thickness-you need it thick enough to shape. 

While the plaster is wet, swipe vertically with the Bristle Liner trowel.
With the same vertical movement, smooth the texture SLIGHTLY with the Magic Trowel:

This step will create the wider vertical bands.


For finishes with multiple actions, you want to do areas in manageable sections.  The randomness of the trowel work should make this easier. You may also use a retarder such as Spatter Add (1/4 cup to a gallon of plaster) to keep the plaster thick but slow down the dry time while you work.


Step 3:  When the Venetian Gem layer is dry, you will apply a mix of Silver Concentrate mixed with Aquawax (1-2 tsp per cup). Silver Concentrate is the additive for Designer Metallic but may be purchased separately in small bottles or 16oz pots.  The Aquawax will provide the binder for the Silver concentrate.  You will use Cheesecloth as a pad to apply the metallic Aquawax. 


Dip the cheesecloth into the Aquawax and rub over the entire surface, making sure the the final pass is vertical.  Let this layer dry.

Step 4:  Mix Aquawax with Rich Gold Concentrate.  Yes, there is a Rich Gold additive as well. Again, it doesn't take much of the concentrate. In this case it is 2-3 TBSP per 1 cup of Aquawax). This mix is troweled on in a vertical manner-the troweling will give you more control for placement.  The gold Aquawax covers 30%-45% of the surface.  

This is applied in sections because you will use the Bristle Linear Trowel again to swipe through vertically. Then you will knock the texture down slightly with the Magic Trowel, also in a vertical manner.    You are repeating the actions from Step One.

Step 5:  When the Gold Aquawax layer is dry, mix Aquacreme (2parts) + Ebony Stain & Seal (1part).
This mixture will be a bit "stiff" but that is good-you want it to catch in the texture. Brush the Black Glaze mix generously over the entire surface.  Remove the excess using the Magic Trowel by pulling the trowel across the wet glaze both vertically and horizontally.


Metallo Spazolatto Venetian Gem Sample by The Faux Finish School

There you go! Not only a great sample but lots of inspiration for using specialty tools! Thanks so much Martin & Morey for sharing.

Interested in the tools and products used for this sample? Please visit the online store for The Faux Finish School at www.fauxmarketplace.com.

You may also start your year by taking a class with Martin and Morey. The next class is January 8th - January 12th for their "Timeless Creations" The Art and Business of Faux Finishing Workshop "Interpretation by Inspiration."


The Faux Finish School, A Division of Decorative Finishes Studio
 414 Baxter Avenue, 3rd Floor Loft, Louisville, Kentucky 40204
www.fauxfinish.com
(502)583-0102


Don't forget-Venetian Gem is the November Product of the month and on-sale now!


As always, thanks for reading!

Rebecca


Friday, August 16, 2013

Charred Gold, The Chameleon Color of Lusterstone: Finish Two


"I'm an Artist. I not supposed to blend in."


We were playing last time with Charred Gold Lusterstone and using it with another Lusterstone, Silver Taupe.  For this finish, I will show the Charred Gold versatility and pair it with Venetian Plaster.  My finish is starting out with Royal Taupe Setcoat which is a really nice (and on trend) mushroom grey brown shade.


I am using a Sea Sponge Roller to apply Faux Effect's Moonstone Grey Venetian Gem.  Using the roller is a fast way to get this texture applied and hides bad walls with flaws/dry wall seams.  Dampen the roller first and load the plaster on.

Cover about 80% of the base working in 4'x4' sections.  When I have a section rolled, I use my blade to gently flatten the finish. It is gentle pressure like putting a smear on your bagel.  This layer should look like knockdown with larger flat areas.


The Moonstone Grey should be dry within an hour to 2 hours for the next layer.  I used Charred Gold Lustersuede this time and tight pulled it over the Venetian.  I opted for the Lustersuede because it is thinner and I didn't want to bury out my base layer.  For light back fills, Lustersuede is a great option and is about $5 less per gallon. That $5 will buy you a Latte to go with your smeared bagel.

Charred Gold also looks great over Brown Sapphire Venetian Gem and Tiger's Eye Venetian Gem.  Lustersuede dries slower then Lusterstone so allow for a little extra set time.  I taped off an area of this sample to show you a complimentary finish.  I do this often in class.  It gives your clients an actual visual of what they would get by paying for an additional layer and/or shows them a suitable finish for a ceiling or adjoining room.

I am tight blading Palette Deco Metallic Pearl using a Japan Blade.  Then I pat with a damp cloth to remove chatter and soften the finish.  You could stop here and have a great finish on either half of the board.  But I am a big believer in the "over-glaze."  Applying a warm brown glaze over most things makes it better.

Case in point:


I mixed 1 Cup Aquacreme + 2 TBSP Dark Brown Faux Crème Color + 1 TBSP Brown Faux Crème Color and brushed it over my entire sample.  I used a lightly damp cloth to pounce and soften the glaze.


And done!  I love finishes like this because the colors blend with so many other things and it works in traditional and contemporary settings. Plus all the products used here are super durable-no need to topcoat!  The finish with the Palette Deco is great for darker rooms with poor lighting-it gives an artificial light and glow.
 
 
I have to stop here. All this talk of bagels, lattes, and caramel ice cream has me hungry. But I have one more Charred Gold Lusterstone finish to share next time.