Showing posts with label Metallics. Show all posts

Tuesday, December 12, 2017

Let It Glow, Let It Glow, Let It Glow

It's the most wonderfaux time of the year!

Happy December everyone. Hope you are getting your projects wrapped up for the year and filling the calendar for 2018. Since this is the season of sparkly lights, pretty papers, and decorations galore, Faux Effects wanted to join in the festivities this month with our most cheerful product....

Metal Glow


Just look at this color selection!


So what is Metal Glow?  Metal Glow is an iridescent paint. It is more sheer and sparkly than metallic Setcoat. But the consistency is thicker then metallic colorants. Plus it comes in 67 colors giving you the largest range of color options. It comes in quarts that cover approximately 75 square feet.

How may Metal Glow be applied? You may spray it-just thin with some water. I like to keep it the consistency of melted ice cream because getting it too thin may cause the metallic to separate and run on a vertical application. At this consistency and using an HVLP the Metal Glow may appear slightly "hammered" when sprayed. That's OK, It will lay out.

Need to roll it? Use a cloth roller verses a foam one. The foam rollers will slide in the metallic. As you roll the Metal Glow, pounce it with a Neon Leon or Stippler Brush. This will minimize lap lines. You may also apply it by brush.

Where do you use it? Glad you asked. How about almost anywhere! Let me show you a few ideas:


Metal Glow may be used as a base coat for cabinetry, either alone or mixed with Setcoat for custom tinting.  The kitchen above was sprayed with a mix of Faux Effects Designer Metallic and Wheat Metal Glow.  The Antique Apricot Finish below uses Sunburst Gold Metal Glow in the base.


And Urban Fern is made with an equal mix of Setcoat Sage and Sea Spray Metal Glow


Metal Glow gives a soft shimmer to ceiling finishes like this one that starts with Leo Gold Metal Glow:

Because of the sheerness, Metal Glow is a great tint for waxes....

The sample above is a variation on a finish by Prismatic Painting's Gary Lord. Eldorado Gold Metal Glow and Urban Steele are mixed with Faux Effects RS Water Wax. The sample below is Silver Lining Metal Glow and Elephant Hide Metal Glow mixed with Faux Effects Aquawax:


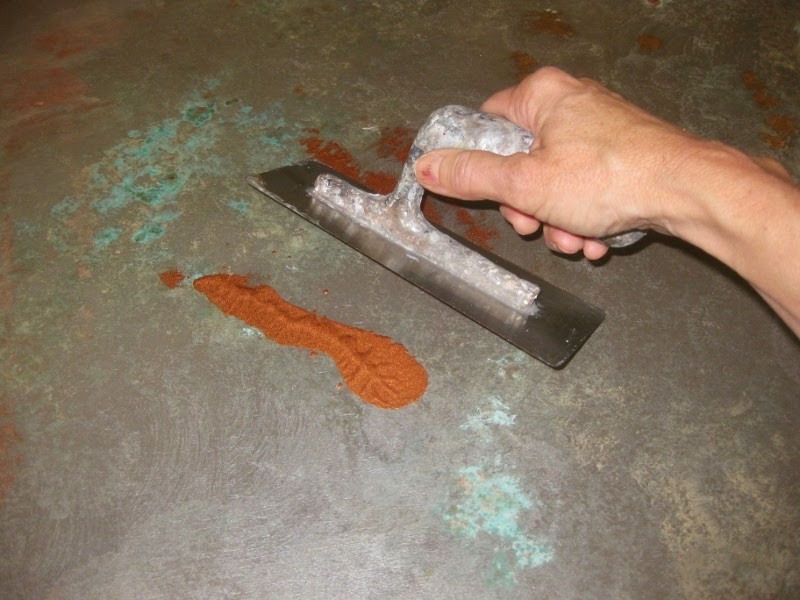
Metal Glow is a favorite for tinting RS Plaster because when you buff the plaster you get a pretty  sparkle like the sample below using Luna White Metal Glow and Rich Silver Metal Glow:


Of course one of the most effective uses for Metal Glow is to mix it with a Faux Effects Glaze Medium.  Our Moon glow Travertino is glazed with Faux Crème Clear mixed with Citrus Gold Metal Glow and Wheat Metal Glow:


A sheer glaze mix of Aquacreme and Toasted Coconut Metal Glow highlight the raised plaster pattern in this Faux Effects RS Sandstone Finish:


Alice Blue Metal Glow + Teal Stain & Seal creates this pretty over-stain for an end table:


I'm going to stop here because we all know that it's better to get your presents spread out over several days (or is that just me?).

Check back this week and next for some step by step DIY projects using Metal Glow including one from The Faux Finish School in Louisville, KY!


Warmest Wishes,
Rebecca


Friday, May 22, 2015

TGIF-Don't be Clueless about a simple Countertop makeover.


That's Good In-Faux
 
 
The question this Friday comes from my friend Phyllis who asked about creating a copper-look counter top over an old surface.  You know what that means....


But first here are some things to think about before tackling an unconventional faux project.
 
  •  How much is the surface used? Is this a kitchen countertop that gets cleaned everyday or a guest bath used a few times a year?
  • Is the condition of the surface damaged from a structural or water problem? You are just using paint not a magic wand.  These things should be fixed by the appropriate professional first
  • What is the material?  Plastic, acrylic, wood, metal, and ceramic have different properties.
  • What is the client's expectation? If they are expecting granite like qualities-they should get granite.
  • All products need time to cure. That means 48 hours for a light cure such as setting things back on the surface, 72 hours for water clean-up and 30 days for heavy cleaning.  Many people will disregard those time frames if the surface is one they use frequently like a kitchen counter.
  • Dry times between layers are critical.  It may only take you 20 minutes to apply a layer but you can not come back until the next day.  Plan on multiple trips even for a small surface.
Still interested in doing a countertop?  OK, let's get started....


Our countertop is wood. Wood is good.  It is an easier surface to work on because it is porous. 
 
To prepare a wood surface, you need to clean it with a degreaser/de-glosser like Krud Kutter, TSP, or Paso.  We prefer Paso or granular TSP (mixed with water).  These products are brushed or wiped on and  allowed to sit for 30 minutes. Then use a 220-320 grit sandpaper to scuff the surface and remove loose topcoat/debris.  Clean the sanding dust and other smutz with a damp cloth.  Give the surface at least an hour for the liquid to evaporate.
 
If the surface is non-porous like cultured marble, after the above steps, you will need to apply a bonding primer.  In the Faux Effects line, I either use Primetch or Stone Décor. Primetch is a silver label product and is as sticky bonding agent.  Roll on a coat with a black foam roller and it will tack-up. When it is no longer stick, you may roll a Setcoat color.  Stone Décor is gold label and involves training. 
 
I let the Setcoat layer dry over night whether I use Primetch, Stone Décor, Primer, or go directly to Setcoat. I used Royal Taupe Setcoat on our wood counter.
 
 
These are the products I used for this simple technique.  I opted not to use the large Mica Flakes as I progressed with the project. The Activator II is the only Gold Label project. If you don't have access to it, then substitute denatured alcohol for a similar effect.
 

Materials:
Faux Effects Royal Taupe Setcoat
Faux Effects Charred Gold Lusterstone and Weathered Bronze Lusterstone
Faux Effects Metallic Copper and Metallic Rich Gold Concentrate
Magic Metals Aqua Blue Patina Solution
Faux Effects Activator II or Denatured Alcohol
Infinity Laser Cut Antique Gold Glitter
Faux Effects Aquaguard Gloss
Faux Effects C-500 Satin
Water bottle
Chip Brushes
Pointed Glazing Brush
Small bowls or ramekins
Black Foam Roller
Sanding block and/or papers

Don't have what you need? Don't worry we carry it.
 
 
Of Course!
 
I'm using Charred Gold and Weathered Bronze Lusterstone but any color complimentary to copper will work.  Spritz the surface with water and dab in one of the Lusterstone colors.

There should be enough water for you to swirl the brush and make the Lusterstone frothy.


Repeat with the 2nd Lusterstone color.  While the Lusterstone is wet, squirt in some Metallic Copper Concentrate and some Rich Gold Metallic Concentrate.


Spritz with more water....


And use a brush to break up the shapes.


The final step in the sequence is to flick the wet materials with the Activator II for small pits or denatured alcohol for larger holes.
 
It seems like a lot of operations to perform in a step but really after you try it a few times, you develop a rhythm. Spritz, swish, and flick....
 

Just work in small connecting sections.


Once a section is done, spritz with some Aqua Blue Patina Solution. The reaction does not happen right away but must be done while the copper and gold is damp.


This layer should dry overnight.  The next day, us a medium to fine grit sanding block. This will smooth the surface and check for bonding. Wipe off the dust.


 Butter your blade your more of the copper and/or gold metallic concentrate.


Pop this on in areas where you would like to see more metallic.
 
To soften transitions, I also repeat this process with my Lusterstone and pulling it tight in connecting areas.

Your goal is to soften the look without burying the pitting motions you created in the previous step.  You may also add more Aqua Blue Patina Solution.

For added bling, I blew into the damp plaster some Antique Gold Glitter.  Some people don't like glitter...


I know, boring right?
 
This layer needs to dry over night.  The next day, sand again and seal.  I like 1-2 coats of Aquaguard Gloss followed by 1 coat of C-500 Satin.  The gloss coats should dry 2 hours between applications.


(Clueless, Paramount Pictures. 1995)


Sunday, August 31, 2014

Watching the Wheels Go Round and Round

It is always flattering and exciting to complete an article for a national magazine.  Studios magazine first appeared on my radar earlier this year when Melanie Royals had a great feature about Royal Design Studio. She graciously passed our name along to the editors and sent me an email. And, like a dope, I didn't do any thing with the opportunity.  I guess Studios was meant to be, because they called me this summer about a DIY project for the magazine. This time my friend Jennifer Bertrand, a winner of  HGTV's Next Design Star, had passed on my name.  Wow! I am a lucky to know talented women.  And this time I wasn't going to squander the opportunity. This is the result:


But how did I get there?  When you are preparing something for a magazine, you have to set some parameters before you start. In this case I had the following:

  1.  The audience for Studios Magazine is creative people interested in how other artists live and work.
  2. My job is to show a finish that an artist might be inspired to use in their space with steps they could easily follow.
  3. It has to be visually interesting with details that photograph well.
  4. The number of products and steps must be limited, price conscience but also creative.
  5. It had to be finished in 5 days.
You also want an article to reflect who you are as an artist. For me, I enjoy layering patterns and treating wall surfaces like hand-printed paper, fabric or a collage. Circles are my shape of choice (I have the motif all over my home) and I lean toward rusty modern industrial styles. Venetian Gem Plaster is my go-to-product from Faux Effects. It is pre-tinted, easy to trowel, holds a pattern well, dries fast, and is durable!

 
My "wall" is Gator Board because I wanted a larger scale sample that looked as much like a real project as possible. Don't you wish you could always just pick up your wall?  The only thing better? Having wings!
 
 
I buttered my blade with Faux Effects Venetian Gem in Tiger's Eye and troweled on a high/low medium coat about the thickness of cake frosting. My mother tells me, "The only part of you they see in the magazine is your hands and they are stained! Couldn't you get your hands at least clean?" This is the faux finishing version of "wear clean underwear in case you are in an accident!" 
 
Hold the trowel loose and at a 45% angle to spread the plaster. Use the Japan Blade to keep your trowel clean.  Less then 10% of the base is showing. 
 
Then you get people in the shop to take awkward pictures of you doing layers while you try to look natural. I used the Large Funky Wheel from Cutting Edge for my first shape. I like this pattern because you can make different sized circles depending on where you fill in.

 
Next, I wanted to add things to give me the collage feeling. But it had to be big enough to see in a picture and easily accessible. I used some big letter stencils from Michael's and troweled over them with the Venetian Plaster.  Then it is time to blow dry the wall....
 
 
and post a collage to Instagram!
 

I found these great rubber lace placemats shopping with my sister who gave me a weird look when I only bought two. "I'm not going to eat on them silly," I tell her. "I'm going to pull plaster over them of course!"  Why would I put a plate over a perfectly good pattern source?

Here is my wall drying. Using one color is a good way to hide when your plaster bleeds under the pattern.
 
 
OK! This is where I go off script and forget my punch list.  I decide to trowel Palette Deco Bronze and Palette Deco Silver over the finish using a cloth to soften the chatter.

And this is how I stand while I do it!
 
 
And post! Do you guys remember when you worked without a cell phone camera? Me neither.
 
And then I sanded...


And I glazed with 2 colors...
 

And I top coated....


And photographed it!
 
Then I realized it. While it was very pretty in person, I had lost the pattern. It was too busy to photograph well! And I had added extra steps! And more product! And burned 2 days!  This was a "make it work moment."
 
I rolled my Venetian Gem Plaster finely over the finish to get it back to the right base and color. When it was dry, I rolled Setcoat Metallic Gun Metal over the whole thing. This is how you demo the roll and soften chatter moves.
 
 
When the Gun Metal was dry, I used a power sander to reveal the brown tips of the pattern. Venetian Gem sticks really well! Then I glazed with Aquacreme and Dark Brown Faux Crème Color. Remember I also have to use Silver Label products so people can buy the stuff if they want to do this project.
 
 
Yes, those are still my Spider Monkey hands.
 
 
I rolled a coat of C500 Gloss and took a picture.  Thank goodness! It photographed much better and had less steps. Whew! Then I formatted the pictures (too small the first time) and wrote the Step by Step. After everything went to the editor, I had a nice chat with the writer who does the introduction.
 
And now I may shame my whole family with my dirty hands on national news stands!
 
Studios Magazine Fall 2014 issue is available at Arts and Crafts Stores, Barnes & Nobel, and by ordering on-line.