IT'S THE NOVEMBER PRODUCT OF THE MONTH
VENETIAN GEM PLASTERS!

Have trowel will plaster....
I'm excited to talk today about one of the most versatile finishing products on the market: Venetian Gem Plaster by Faux Effects.
The product is easy to trowel with the consistency of peanut butter. I like to butter my application trowel using a smaller trowel...
pop the Venetian Gem Plaster on the surface....
and then hold the trowel at a 45 degree angle to gently blend it.
You want graceful trowel lines....this isn't dry wall mud.
Because of the product thickness it is a great choice for creating "shaped" base coats with just a trowel. Right now the horizontal line effect is very on-trend. Venetian Gem is a perfect choice to achieve this look!
Moonstone Grey Venetian Gem shaped with a blade
and then skimmed with Galaxy Stone Tint Base. A simple 2-step modern finish!
It is also a favorite product to use with stencils like this Venetian Gem Alligator Finish
for cabinets. The Alligator Stencil is also from Faux Effects.
And it's a go-to for using specialty rollers. Sage Venetian Gem Plaster is rolled thru with a Brocade Roller. Sandstone is tight troweled over the dried Venetian Plaster. You could stop there. Or you may glaze it. Or add another larger pattern as I did in the sample below.
Venetian Gem is durable, high hide and has great chemical resistance. I suggest this product specifically for bathroom makeovers. These bathroom walls were Orange colored orange peel but I was able to shape Black Onyx Venetian Gem over the walls without skimming them!

Venetian Gem is a product I always use over Faux Effects Setcoat. In this case, I used Black Setcoat. If you use a latex paint, you run the risk of the Venetian Gem cracking or not bonding as well. Because the Venetian Gem Plaster seals so well, it is a fantastic base for metallic foiled finishes. For the bathroom above, the shaped Black Onyx is rolled with Foil Size and then covered with bright silver foil. Next I pulled Queen Anne's Lustersuede on top. Again a nice modern finish!
Don't forget the polish! One of the main reasons to select Venetian Gem Plaster is the ability to control the degree of shine. With no polish, the product looks matte which is great for leather looks like this cracked Sand Venetian Gem. The Sand Color is mixed with Faux Effects Cracklemate and troweled over a coat of Aquasize. I glazed it with Stain & Seal.
Want more shine? Just polish with the edge of a quality steel blade or use a rotary brush in a drill.
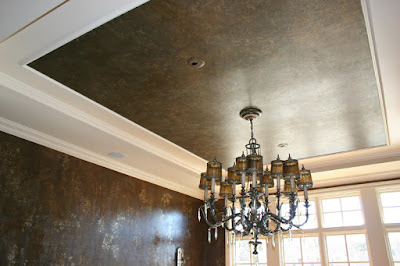
I love this look for ceilings like this dining room ceiling in Venetian Gem Tiger's Eye!
This is the wall finish...
My Sheraton Silver sample (and dining room wall) uses another product from the Venetian Gem line: Ultra-Polishing Venetian Gem Tinting Base. Wow! That's a mouthful. Let's call it UPVG Tint Base from now on. This is a tint-base for Venetian Gem. The product is translucent in nature and may be tinted with Faux Crème Color and Metal Glow to make your own polish plaster colors. I also use it as "thinner" for pre-tinted Venetian Gem Colors. For the sample above I mixed the UPVG Tint Base with Tiger's Eye Venetian Gem to make the color less saturated. Then I also mixed the UPVG Tint Base with Moonstone Grey Venetian Gem to make it more translucent to pull over the Tiger's Eye. A multi-use product!
But wait! Isn't there a Venetian Basecoat? And how is it different then the UPVG Tint Base? That's a good and frequent question! Venetian Basecoat is a more opaque tint base-it looks white in the bucket. Because the material dries to a matte finish (verses a polish coat like the UPVG Tint Base) there are more tinting options. I've used Setcoat, Faux Crème Color, Stain & Seal, and even a high quality latex flat paint (but only 20% to tint a gallon).
When would you choose this product? 1) If you want a matte base under the higher polish Venetian Gem for contrast. 2) You want a matte base you may tint and shape. The consistency is thicker then O'Villa Plaster so I use it for the classic Skin Finishes with cheesecloth or rollers.
The finish above is Venetian Base Coat tinted with Metallic Gunmetal Setcoat and rolled with a Croc Roller.
So what is Venetian Finish Coat? Venetian Finish Coat is a translucent product that may be used as a sealer over Venetian Gem for a shine without mechanical polish. It may also be lightly tinted for a sheer color effect over Venetian Gem Plaster. I like to mix it with metallic Faux Crème Colors or Mica Powders which works well with the shinier nature of the product. I use this technique over the matte Venetian Basecoat as well to achieve the subtle glow seen in the finish below.
Have some Finish Coat on hand and want to use it as a basecoat? Sure-that works as well. Many people like the consistency of this product for creating effects similar to wallpapers.
And there you have it. You can not accuse Faux Effects of limiting your Venetian Plaster options!
Venetian Gem Plaster may be used outside but please consider the weather and other conditions. Make sure you prep properly and use Setcoat as a base. Then we recommend top-coating with Aquathane with UV protection.
And visit the blog on Monday for Venetian Gem recipes including this one from Sheri Zeman, owner of Faux Design Studio, the Gold Label Training & Retail Studio in Chicago!
Don't let anyone dull your shine!
Rebecca


.jpg)
.jpg)
.jpg)
.jpg)
.jpg)
.jpg)
.jpg)
.jpg)
.jpg)
.jpg)
.jpg)
.jpg)
.jpg)
.jpg)
.jpg)
.jpg)
.jpg)