Monday, August 30, 2010

Bathroom Makeover: The Walls of Guest Bath One


This is a small plain guest bathroom.  The walls are painted a Farrow and Ball color "Lullaworth Blue." Pretty color but not very exciting. The adjacent bedroom is finished in a rich brown, blue foil, and custom gold Lusterstone.  The bed frame is a bronze metal rubbed with dark brown and black and the quilt (a gift from my mom) is pale cream with rich russets, gold, and bronze Japanese fans. The quilt is trimmed in a deep blue.  Against the bedroom's saturated earth palette, this bath fell flat.

This is a close-up of the wall and bed frame finish.  The Willow Stencil is from the Mad Stencilist. 

Bruce removed a built-in medicine cabinet that was ugly and non-functional.  I primed the patch and painted the entire room with the new Dark Brown Sharkskin.  Dark Brown Setcoat would work in this application-I used Sharkskin to test the coverage of the new product. Less then a quart covered the paint in 1 layer.  If more of the base showed in the final result, I would've rolled another coat.


I rolled the Sharkskin in the morning and could apply my Wunda Size by the afternoon.  Here I am spotting in the Wunda Size with a Sea Sponge. The Wunda Size may leave some texture-that is desirable.  I created connected areas leaving 70% of the base color showing. The Wunda Size should set-up at least 1 hour.


When the Wunda Size is tacky but not wet, I applied the Caribbean Blue Foil.  The pretty side should be facing you and scrub the surface hard with a Robert Brush or a stiff dish washing brush. Once the foil is applied, you can go right to the next step.  I buttered a blade with Cocoa Lustersuede and popped it on the wall in connecting areas making sure to leave some of the foil visible 100%.  In other areas, I tight trowed down the popped Lustersuede so the foil tops barely peeked through the Lustersuede.

You can see in this picture that 20% of the Dark Brown base color and 20% of the foil are still visible .

And here is a close-up of this layer. Lustersuede dries much slower and is thinner then Lusterstone. It also costs $5 less per gallon. Since I don't want to create product build with this layer-Lustersuede is the better choice for this finish.  This layer must dry over-night.
Once the Lustersuede is dry, I use a brush to spot in Bright Gold Faux Metal straight from the bottle. Faux Metal is real metallic shavings in alcohol.  If the Lustersuede is damp, the Faux Metal will tarnish. Use the brush to create highs and lows with the Faux Metal-this stuff sets slow.
After I apply the Faux Metal to an area about 3'x3', I use a trowel, flat to the surface, and I "smear" the Faux Metal.  Make sure that you don't bury out all the Dark Brown base, Blue Foil,or the Cocoa Lustersuede.
The Faux Metal needs to dry over-night. The material dries opaque and with a wonderful true low metal sheen.  Since I want to glaze this finish, I seal the surface with C500 Gloss and wait 2 hours before I start glazing.

I brushed on at the same time Dark Brown Faux Color and Dark Brown Faux Creme Color mixed with Aquacreme. A terry towel or rag is used to pat out and soften the glazes. The glaze tints all layers at the same time and helps bring the whole surface together.
The finished wall. I selected Antique Brass switch plate covers and they blend well.
To compliment the walls, I added some modern artwork that includes all the metallics in the room (dirty gold, brass, and brushed nickle) and blues found in the foil and the adjoining bedroom.

This finish looks rich and makes the room glow.  It is simple to accomplish and takes less then a quart of every product used. I needed less then 1 roll of foil. Economical but looks high-end-what more could anyone want in a finish?

Bathroom Makeover: The Vanity Cabinet of Guest Bath One


Let's get back to the bath.  My next project in this guest bath is the vanity cabinet.  It started out as your typical stained and varnished red oak.  This piece had turned turned very red-orange-like self tanner!

I cleaned the surface with TSP, did a light sand with 220 grit paper, and wiped it off with a damp cloth.  Next I used a Stain-blocking primer.  Setcoat is not a stain-blocker.  In the past 6 months, we have noticed a change in the reaction between pigmented shellac and Setcoat.  The shellac is not curing enough to the substrate and turns gummy when the Setcoat is applied. This happens in less then 10% of jobs but is enough for us to be concerned.  I have successfully used both Zinsser Water-Based Matte Primer and Bin 1,2,3, Water-based Primer under my Setcoat. For this project, I used the Matte Primer and could apply my next coat within an hour.
I rolled and brushed the primer. It didn't need to be pretty because my next coat is a low texture.
I tint Master Finishing Medium with Dark Brown Setcoat and stipple it with plastic. MFM is a gold label product that we use for several purposes and introduce in our Cabinetry I class. It makes a very hard but low relief texture.  MFM sands well to remove rough tips-you want furniture, even those with a texture, to feel smooth.
I rolled an additional layer of Setcoat because I wanted the color to be solid.  The Primer, MFM, and additional Setcoat layers may be applied in the same day. If you are unsure about bonding, always do a light sand between coats. On day 2, I rolled Wunda Size 100% over the surface and let it tack up over an hour.  The foil will off-load better if the size sets up longer.  I applied a new color of foil, pale gold, 100% over the surface.  Since there is a texture, you will still some the brown under the foil.
The great thing about foil is you may apply your next layer immediately.  I brushed Silver Faux Metal 100% over the foil and rubbed it down with cheesecloth so I could still the gold foil underneath.  The Faux Metal should dry overnight.
The next morning, I sanded with a fine sanding block to reveal more of the gold foil and the Dark Brown Setcoat on the highs of the texture.
You can see the foil and brown layers better in this side view.  I glazed the piece with Dark Brown Faux Color and American Walnut brushed on at the same time.  When the glaze dried, I felt the tone clashed slightly with the wall finish.  I brushed Bronze Stain and Seal 100% and softened with cheesecloth. Then I tipped the piece with Dark Brown Faux Creme Concentrate. These layers were completed in one day.
I rolled/brushed Aquaguard Gloss for my first topcoat, let it dry 1 hour, and then rolled/brushed a coat of C500 Dull. Since the wall and counter have a sheen, this needed to be a matte finish.

The greatest challenge to bath vanities is the drive time to complete the project. A cabinet this size may take only 30 minutes to 1 hour to complete each layer but you have dry time considerations.  The job might be 5 hours and spread out over 3 days. I would always try to book the whole room or another project in the house-offering a package deal is worth a few bucks to on save wasted travel time.

Wednesday, August 25, 2010

Bathroom Makeover: The Counter of Guest Bath One

A Modern Metal Makeover!


I decided to makeover this entire bathroom using (and testing) new products on a variety of surfaces.  So far, I've completed the Vanity Counter top, Vanity Cabinet, and the Walls.  I am in the process of finishing the shower tile and the door/trim.  I will also be finishing a mirror surround using Bomar pieces. This was the bathroom before:
Pretty Blah...looks like an apartment bathroom. This room is small but has good light. It needed to coordinate with the adjoining bedroom. And, since this is the bedroom most students stay in when they attend classes, I wanted to showcase several faux finishes.

The walls in the bedroom are venetian plaster with blue foil and a custom gold Lusterstone. The metal bed frame is an oil rubbed bronze.  The room is dark and serene so I wanted the bathroom to have a modern jewel box quality. Since blue dominates the bedroom-this would only be an accent color in the bath. For a brighter bathroom, I went stronger on the "tarnished" gold aspect.

The Counter Top Finish:  This is a typical Cultured Marble (acrylic) counter top with a cast back splash.  There is a separate side splash piece.  It also has a large chip on the edge.  I did have the faucet removed because I want to replace the fixture but I didn't have the drain and stopper removed. This is a mistake that will haunt me later.

I taped plastic under the faucet fixture holes, pushed down the drain piece and stuffed it with plastic. I left the metal drain raised before I applied the finish but pushed it down before pouring the epoxy.  The counter was cleaned but not sanded or primed.

The Stone Decor is mixed in equal parts, tinted a light brown and brushed over the Cultured Marble.  I stippled this finely with a Neon Leon Brush but left it thicker in the chipped area. This layer needs to dry at least 6 hours but I waited overnight and sanded it first thing in the morning.  It stuck great even with vigorous sanding on the sink edges.

(Dried Stone Decor)

My color layer was accomplished with tinted Luna in a dark gold, light gold, and cream. The three colors were brushed on and again stippled with the Neon Leon. This makes for an easy application on a curved surface.  The Luna needed to set for several hours before sanding. I reapplied my Luna for a denser coat using a brush, flat troweling the product and basically compressing the mica. For the sink and curved back splash area, I used a small rubber triangle trowel.  I again sanded when this layer was dry.

(2 layers of Luna tinted 3 colors)

To customize this finish more, I used a favorite stencil from Wallovers-the City Swirl.  I mixed silver glitter into Aquawax and troweled it over the stencil-fading the pattern in and out.  I opted out of the sink-it was too hard getting a clean pattern on the curved surface. Aquawax dries fast-less then an hour-and I was ready for the next layer.

To really pop the stencil, I rubbed a tea-stain glaze over the entire counter top.

I decided to apply the Rock-Kote Epoxy to:
1) Fill the area creating a smooth counter top
2) Amplify and add depth to the finish
3) Practice pouring a sink and a back splash.
I will go more into depth about the Rock-Kote in a later post only on that subject but will give the basic to this counter.  I taped plastic really well under the counter to catch the epoxy that dripped over the side.

The key is keeping the material thin but pouring it thick.  I began my pour on the top of the backsplash and used a sponge brush to draw it down the back splash sides.  As I worked, I used a torch to keep the material thin and moving.  Next I poured the counter and then into the sink. I used the sponge brush to remove the excess epoxy drips under the counter.  When I thought the pour was 100% meaning I had no gaps, I torched over the entire counter to level and release bubbles.

I waited 30 minutes and then pulled the tape and plastic inside the drain and wiped the drain. Some epoxy did drip into the cabinet and in the drain.  When the plumber returned to install my new faucet, he realized he had turned the attachment pipes the wrong way while removing the old fixture!  It wouldn't turn because I set the drain in the epoxy!  I used a blade and scored around the drain removing it and allowing the underneath pipe to be turned.  Amazingly the epoxy only cracked around the drain and nowhere else in the finish.


I noticed a small divot in the epoxy and attempted to fix this with the new Rock-Kote Creme, a trowel on epoxy.  I did a sample in the studio and it seemed OK.  But when I tried it on the counter, it left trowel lines and dried a different sheen (more like Aquawax) making the area worse-ugh. I decided to hone the entire finish with a palm sander using 600 paper followed by 1000 wet sandpaper. The dust was wiped off and then I rolled a coat of C500 gloss which removed some sanding marks and helps prevent future scratching. Now the entire area is smooth and has a more "granite-like" sheen.


Monday, August 16, 2010

Waxes and Faux Finishing

Who said Monday has to be blue?  Let's get our shine on shall we!
Our product line, Faux Effects, offers five different waxes with different sheens and application properties. Most are appropriate for a variety of surfaces and one, Master Finishing Wax, is specific to cabinetry.  Before I get into the different waxes, let's go over why you would select a wax in the first place.

Waxes in faux finishing accomplish several things.  They offer a translucent to semi-opaque medium for adding a decorative layer to your finish. 

(Faux Color mixed with Aquawax and troweled over Brown Sapphire Venetian Gem plaster)

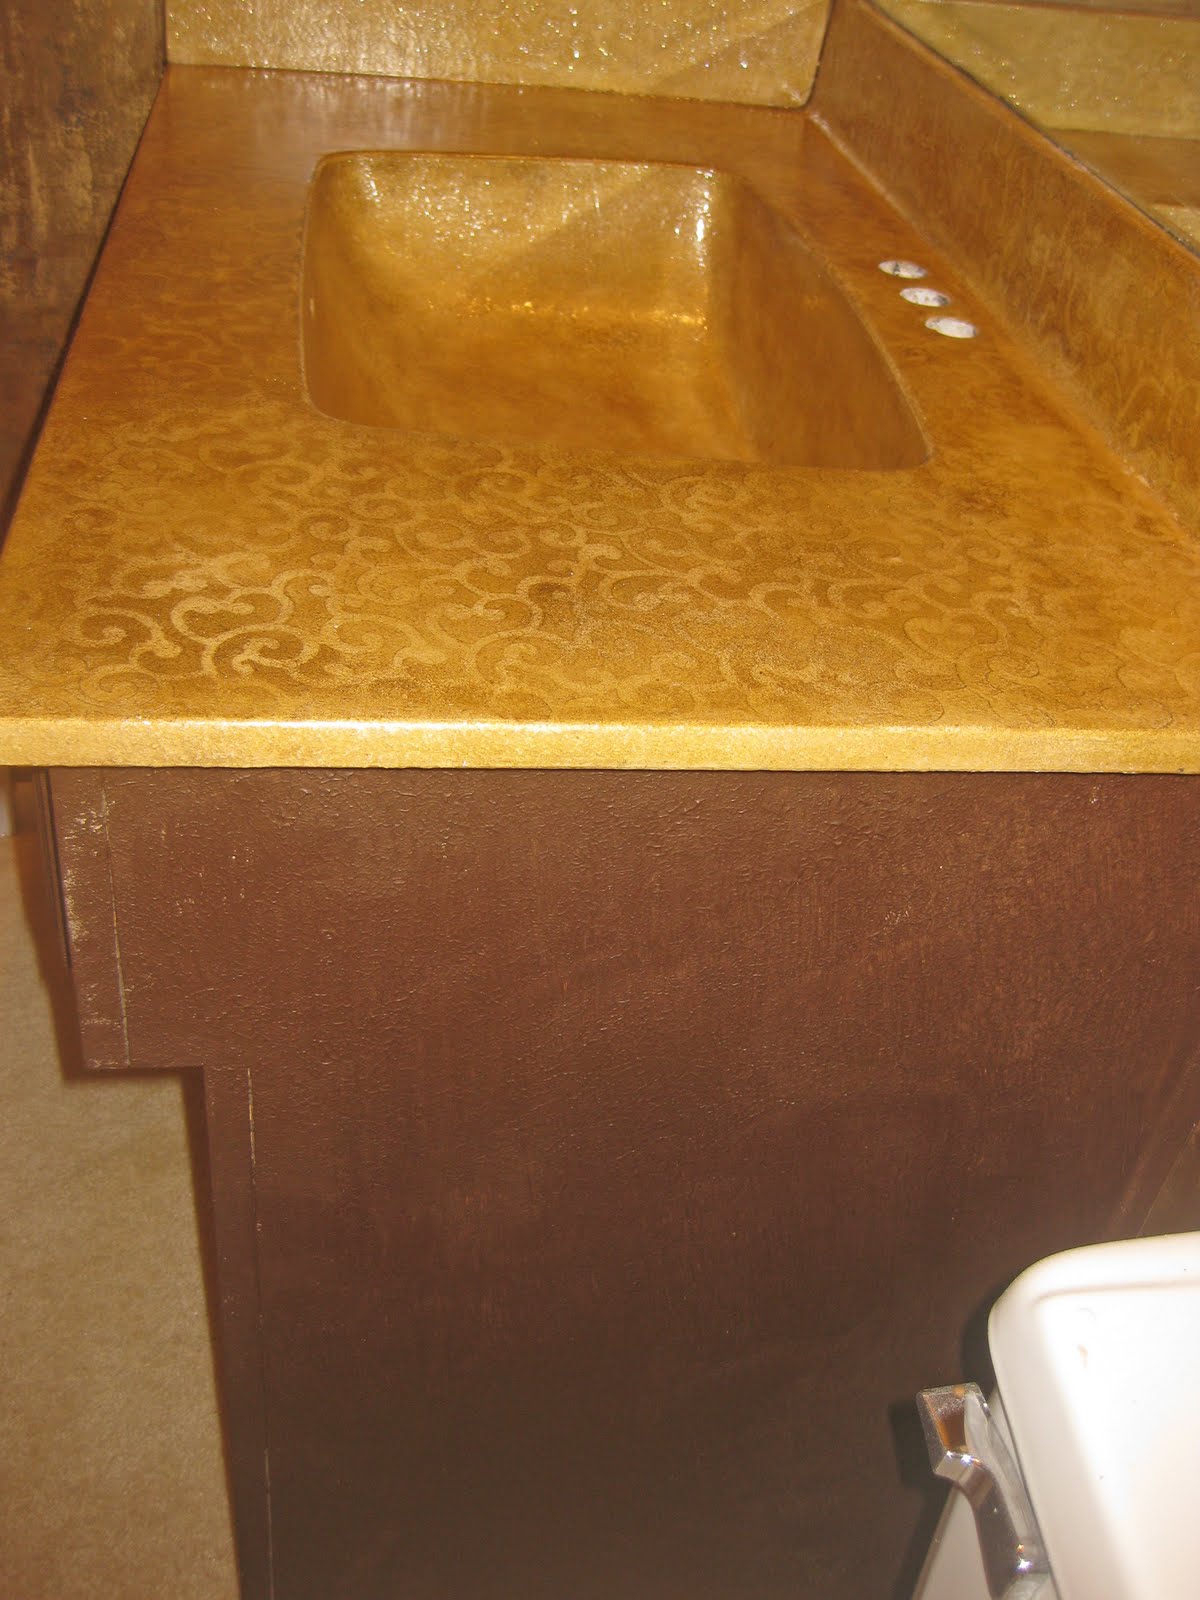
Because of the thickness of wax compared to glaze mediums, wax will hold everything from colorants, mica powders, glitter and beads-often in a trowelable form. 

(Aquawax with Silver Glitter over Foil and Lusterstones)

Waxes are an appropriate choice when you want to smooth a finish or fill in voids but still see the layers underneath. For example, Ashley and I completed a Lusterstone project in a loft that was long and narrow.  The single natural light source was a large window at the end of the "shoebox" space.  If the light was behind you or you stood in front of the finish, the walls appeared smooth.  But when you entered the space with only the natural light source, the wall application appeared uneven.  Our solution was to trowel a thin coat of O'Villa Wax. This "smoothed" the appearance of the surface but did not change the depth or color of the original Lusterstone technique.
(Combed Softex back filled and smoothed with O'Villa Wax mixed with pearl mica powder.)

Waxes may also be used as the finish medium and do not have to be layered with other products.
(Layers of tinted Aquawax)

Finally, many waxes are a topcoat adding a protective and decorative layer to your finishes in one step.
Waxes are particularly effective in wet areas such as kitchens and bathrooms or in children's rooms where scrubbing is a priority.

(Custom tinted O'Villa Plaster with O'Villa Wax in a young boy's room)

So what are the Faux Effects Wax options?
The first wax is a Silver Label product, Aquawax.  This acrylic wax is translucent in nature and may be tinted with a variety of colorants and mica powders.  It dries to a shiny sheen therefore it tends to look more contemporary.
(Aquawax mixed with metallics and Verdigris Colors)

Aquawax is a great choice for ceilings where you often want greater light reflection.

(Gold tinted Aquawax over Venetian Gem Plaster and Palette Deco)

It is a good medium for holding glitters but may fog if you are trying to create a build thick enough to hold glass beads. 

(Aquawax and silver glitter over a Wallovers Stencil)

It will also fog (white areas) if troweled thickly over a dark surface. Building your finish with thin layers is a better approach.  Aquawax dries quickly so multiple layers in a single day are easily accomplished.  Because it is thin in nature, it is a nice choice when you don't want to bury your previous layers.


(Aquawax mixed with MetalGlow over Sandstone)

Aquawax is considered a troweled product.  Because it dries fast, it is difficult to brush over a large surface.  I have thinned tinted Aquawax with So-Slow for a contemporary furniture finish that I am developing for a metallic cabinetry class.
(Aquawax mixed with colorants and So-Slow over a metallic base coat)

Faux Effects does have a wax specific to furniture, Master Finishing Wax. This is a Gold
Label product and does have some application nuances.  It is best applied by soaking cheesecloth or a terry towel in the wax and spreading on the surface in one direction following the grain.  It dries fast and may be extended with So-Slow.  MFW should set at least 30 minutes before applying additional coats.  It may be hand rubbed or lightly sanded with 600 grit wet paper on the final coat.  I like to tint the MFW with a dark color to tone and seal my furniture pieces in one step. Because this is a hand-applied finish I find it to be more practical for furniture then kitchen or bath cabinetry.  If a client wants a waxed look for larger scale cabinetry, I mix Satin and Dull Varnish Plus that I may spray or roll.
(Master Finishing Wax tinted black over my Krishna Blue Sample)

A favorite wax here at Surfaces is O'Villa Wax.  This is a Gold Label product that is a companion topcoat for O'Villa Plaster but is not limited only to this application.  We love O'Villa for the low sheen that creates a more traditional or old world look on many of our finishes.
(O'Villa Wax tinted the darkest shade over tinted O'Villa Plaster)

O'Villa Wax is translucent and trowelable like Aquawax but spreads thinner and melts into the surface. In the living room picture above, the O'Villa Wax allowed us to apply the darkest shade over the plaster adding depth but not hiding the underneath colors. It also highlighted the trowel lines in a soft manner.
Because O'Villa Wax has these properties, it is not our first choice for holding beads or glitter particularly over stencils.  O'Villa Wax is a good enhancement for Lusterstone finishes because this wax plays nicely off the fabric look of Lusterstone.
(O'Villa Wax mixed with Gold Mica Powder troweled over custom Red Lusterstone Colors)

We love our Venetian Gem product line because it covers well and we can get rich dark colors. Some clients do not want the classic high sheen of a Venetian Plaster but they want a sheen and depth to the plaster. We find that O'Villa Wax is a good choice in this case.  It also works well when the client wants a metallic but "Not Too Shiny!"
(Cracked custom blue Venetian Gem with O'Villa Wax in pearl and silver)

Another wax in our line-up is the RS Water Wax.  Although this is part of the RS Series it is not an "activated" product. This is a true paste wax and looks slightly yellow in the container.  Unlike O'Villa, Aquawax, and Master Finishing Wax, the RS Water Wax will not dry clear-so it should always be tinted!
It also dries significantly lighter but will darken on the highs when buffed.  I find tinting RS Wax deep shades to be difficult-the colorant turns the wax soupy.  It is also a soft topcoat.  For heavy use areas, I wait 48 hours and then roll Color Seal over the cured RS Waterwax.

The water wax is a pretty finish when mixed with metallic colorants or MetalGlow colors. It has a low luster sheen and feels soft.
(RS Water Wax mixed with MetalGlow over Lusterstone)

I select RS Water Wax when I want a more opaque wax that will more thickly fill the voids in a finish but still allow the under layers to peek through.

(RS Water Wax over Sandstone)

I did use the RS Water Wax over Lusterstone in our Master Bedroom last year and noticed that the color has faded even though the room gets little natural light.  I can only assume that my tint was too light and cured down in the finish over time.  I will try rebuffing first to see of that helps. I have used RS Water Wax for client projects and have not received calls alerting me to this issue.  I did use a neutral colored RS Water Wax in a kitchen and needed a more aggressive topcoat.  The Color Seal Satin I applied did enhance and darken the overall appearance of this wax. 

Our final wax is our only petroleum-based product in the Faux Effects Line.  Old World Venetian Wax is used primarily with lime-based products. It may be tinted with Mineral Pigments and Faux Creme Color Concentrates for darker shades and Faux Creme Colors for lighter shades.  It will burn out Faux Color.
(Old World Venetian Wax over Stucco Lustro and burnished in Gold Mica Powder)

Like most lime-based products, this wax buffs to a beautiful glass-like sheen and feels the least "plastic" or artificial of all the waxes.  Some people find the smell strong and unpleasant so wearing a mask may be in order.  The smell dissipates as the wax dries and cures. Also wear gloves-this wax is irritating to your skin.  When I apply it to ceiling finishes and it is hot, my face breaks out in a slight red rash that itches.  The wax looks so wonderful that I have gone through this several times-the sacrifices we make for clients!
(Old World Venetian Wax over Stucco Lustro)

But I do it for myself as well. I love this look so much I used in our Master Bedroom (above photo) and...
Our Staircase wall and...
Our lake house fireplace wall. 

The OWV Wax is the key to all of these finishes.  The OWV Wax is applied over StucoLustro in the lake house picture above. This is a flammable product! Do not use near an open flame.  All tools need to be cleaned well with water prior to storage and rags/cheesecloth should be soaked with water before disposal
Dry time is important to polishing the OWV Wax. If you polish it too soon, the wax will actually dull.  If the wax color is offloading on your polishing device, then it is too wet. And speaking of polishing...
You are crazy if you do not own one of these brushes! We carry them here and I use them to buff my RS Water and Old World Venetian Waxes and all my polish plasters ( Stucco Lustro, StucoLux, RS Plaster, RS Stone, and Venetian Gem).  You'll think that the stiff bristles will scratch the surface but no, no, no. It will save your arm.

A few final words on waxes.  I always consider how easy it will be to color correct or change a finish both as I am working on it and down the road.  O'Villa Wax, Aquawax, and Master Finishing Wax may be glazed although the glaze will bead some on the wax (it will dry down and adhere). These waxes may also be primed out and re-painted. 

The RS Water Wax is more difficult to glaze and re-paint.  If an area of RS Water Wax is too dark, we have used a wet cloth and rubbed it down but this needs to happen the next day before the wax begins curing.  This also worked if the wax was applied more heavily in some areas.

If your color is off on your Old World Venetian Wax then you are in trouble. This is very difficult to remove and must be done chemically.  It is also difficult to paint, prime, or re-glaze.  Again, you must strip the wax-so explain this to your clients ahead of time and have them sign off on this in your contract.

Now go Wax On-Wax Off Grasshoppers!
(The Karate Kid, 1984 Columbia Pictures)