SPOUSES FAUXING HOUSES
 |
"Our love is like a ship on the ocean and we've been sailing with a cargo full of love and devotion" Meet Sandra and Jeff Lassley. This husband and wife team have been wowing clients in Omaha, Nebraska and beyond for decades with their faux finishing and design talents. Their residential and commercial work has been featured in numerous local and national publications. Sandra, affectionately known as Sass, is a recognized mentor, moderator, and member of several decorative painting associations and organizations. When you meet people like the Lassleys, you feel right away that you are old friends. And you are left wondering... "I wonder what their home is like?" |

"When a man’s home is born out of his heart and developed through his labor and perfected through his sense of beauty, it is the very cornerstone of life." ~ Gustav Stickley
This is a home about the details. All of the elements from the finishes, to the lighting, and the fabric choices
are brought together in rooms that feel very rich and warm. I've worked in many homes where the decor is beautiful but you felt the designer's presence more then the homeowners. That is not the case in this home. There are elements of exotic travels, a little whimsy, sophistication but never stuffy, and overall comfort. And throughout the rooms are pictures of family and friends that make the Lassley house a home. Let's start the tour...
When Ashley and I pulled up we knew we had arrived at the right home. Look at that front door! Bomar pieces and studs make a simple glazed door appear like metal-details!


Then entry and living room feature a "frottage" technique but again there is a twist. More then the expected stone blocking or smushed paper, this has a nice irregular movement that is still a soothing back drop for collections. I was obsessed with this finish all weekend.

The entry light fixture.
Here is the dining room. You will notice that many ceilings in the home are also finished. I can not imagine how much their necks hurt completing all these but the detail completes the space and provides a foil for the lighting. Did I say that I have popcorn ceilings?


The dining room finish closeup.


Love the fixture. It manages to look both retro, old world, and modern at the same time. The compass rose is a nice classic way to emphasize this light. The room below is the main level powder bath with a green glazed mirror.


Another fun light fixture with the same technique on the ceiling.

The lower level has a slightly different tone. The look is more lodge but ties together with the same earthy palette used throughout the home. These walls are a crackled and glazed plaster.

Close-up of lower level walls.

This office was a total surprise. I have seen activated glazed finishes but never done in geometric patterns with it continuing on the ceiling. The glazed doors and woodwork are a warmer counterpoint to the vibrant walls then white.

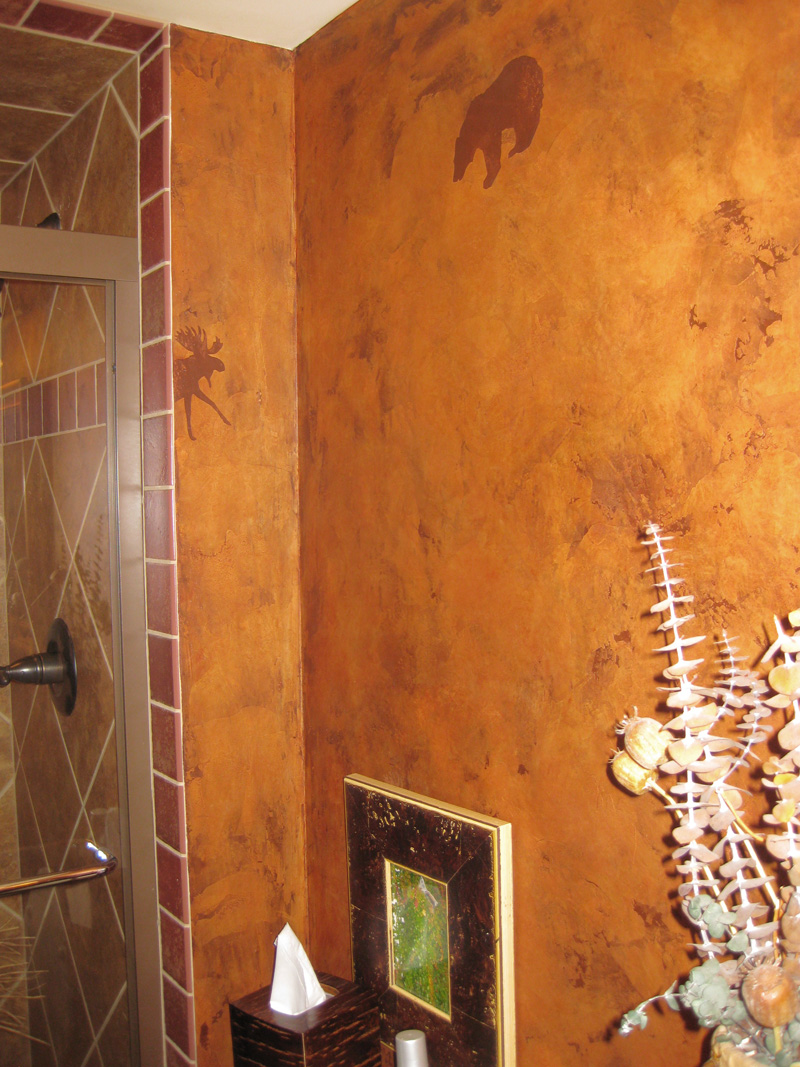
The lower level bath in cherry glazed plaster. Again the details. Here we have bears, deers, and moose (es?) carved in the finish.

Jeff built these wooden cubes with a skin finish.

The upstairs office has soothing smooth plaster walls with a Cayenne ceiling.

These tissue walls are a taupy gold like the shantung drapes.

You need to keep looking up. The corner designs have the same gold, silver, and bronzes found in the fabric.

This bedroom has many good ideas. The walls resemble a burl showing that a wood finish is appropriate for a wall. The ceiling is red leather. The art work is plaster with a stencil and Bomar. Can't find the right piece? Just make your own. And by using just one panel pulled to the side on the window, the treatment looks finished without looking heavy.

We both love this bathroom with it low texture. The stencil is a newer Royal Design called Corsini that Sass fell in love with. Rather then apply as a continuous pattern, she has placed it randomly around the room.

Here is a close-up of the finish and the stencil. The low texture walls have a warm sage and slight amber glaze.

A adjoining sink area to the bath. It is done in a polish plaster with the colors in reverse. Here the amber is the base with a pale sage and gold pulled over the plaster. And the mirror feels like something found in an open air market.

The same finish is in the bedroom. Notice all the window treatments with cornice boards in lovely shapes and fabrics. I am lucky to hang a curtain rod! There is even a white noise machine in here-just like a spa retreat.
Thanks to Jeff and Sass for welcoming us into their home and allowing me to photograph the interiors. I hope you find it inspiring. I've been contemplating since my return what I am going to do to my own home to unleash more creativity-starting with those popcorn ceilings! Jeff and Sass-how about a trip to KC?
 |
| Boy ain't that the truth! |