Tuesday, May 29, 2012

Speciality Rollers: DIY Classic Alligator

It's time to Rock around the Croc


An important criteria for me when I am evaluating a new product or tool is how versatile is it in creating different looks. Now this is the Alligator roller so it is always going to look like a skin but by using it in different products I am able to create many different looks. Here are just 3 for you to try. Let's start with a classic.

The Leather Alligator:


I started by trowel a medium thick layer of Faux Effects' Brown Sapphire Venetian Gem. This shade is a medium toned reddish brown.  The thickness of the product makes a difference. If it is too thin, the roller will not make in impression. You can tell your product is too thin if you can see the base color through the plaster layer.  If the plaster is too thick, the impression will not be as clean.  Let the roller do the work for you by applying light pressure as you roll.


On a wall, trowel the width of two-three roller sizes. I place the roller at the top of the "wall" in the wet material and roll down.  For my next pass, I flip the roller and lap the center section before rolling down.


Corners, edges, and small spaces are always a concern.  I encourage people to purchase two rollers ($19.95 each) and cut one roller. Cut one the size of the 4" stub roller.  The other piece I slice down the side and peel from the roller. This will make a stamp for getting close to the ceiling line or corners.

When working with distinct patterns it is always important to really evaluate the space and take in consideration not only the height of the surface but how much the room is broken up with molding and door/window openings.


I use the roller twice and then wipe the surface with a damp cloth to keep the pattern clean.  Before proceeding to the next wall, I will wash the roller and use a small scrub brush on the pattern.


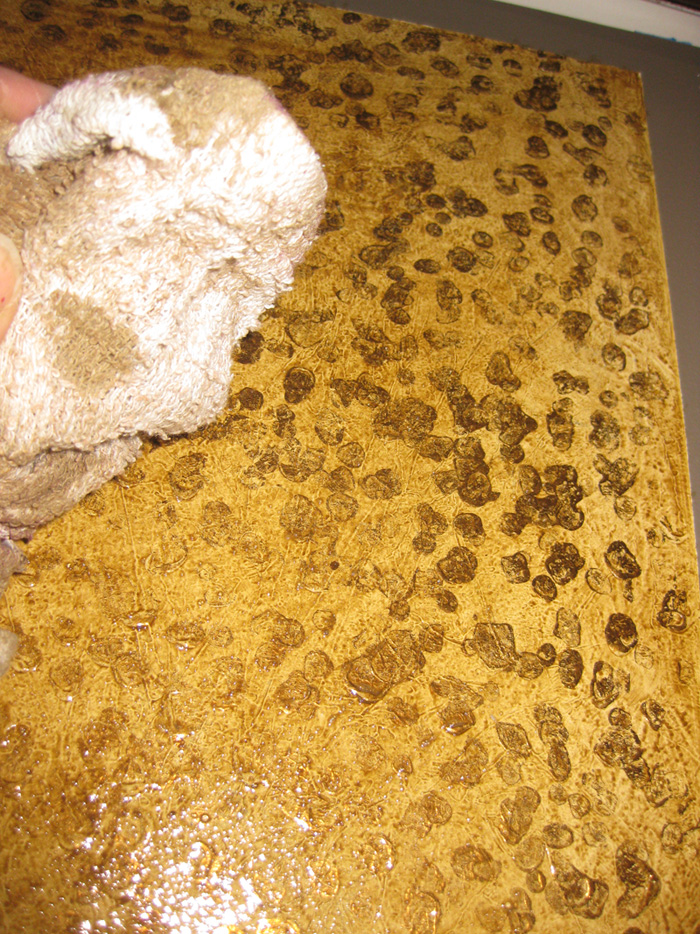
When the Venetian Gem is dry-which takes about an hour-you could go directly to a glaze layer. But I decided to add a little bling to my gator so I rolled a coat of Bronze Setcoat 100% over the surface. Besides adding a nice color, the metallic will make it easier to glaze in the next step. Remember we are working over Venetian which is a polish plaster. If you rub your glaze too aggressively directly over the plaster, you will polish the plaster creating splotches in your finish.


After rolling a section of the Bronze Setcoat, I used my trowel to pull off some of the bronze and pop my pattern.


Next, mix 3 parts FX Thinner with 2 parts Van Dyke Stain & Seal and 1 part Antique Mahogany Stain & Seal. Brush this over the surface and soften brush strokes with a cloth.


As the stain dries, I like to pull across the pattern with a foam brush to push the color into the pattern.


When the finish is dry, you may always topcoat for extra pop and protection. I like to use C500 satin because I find it to be the most clear and have the most pleasing sheen.


Classic Leather Look Alligator-Totally Suitcase worthy!


Later this week I will show you two variations on the Alligator finish using different base materials and adding metallic foils.


Tuesday, May 22, 2012

Specialty Rollers: DIY Ostrich Finish


Let's create an Ostrich Skin Finish!


"Say What?"

Don't worry big guy this is a cruelty free finish. There are lots of ways to create an Ostrich Finish. You can use paper and stencil or plaster with a stencil. Each has a great look and like everything else it often comes down to how much will a client pay to achieve a certain look. This approach is a fast and funky way to create Ostrich using our new Spots Roller.


I'm using Faux Effects' Venetian Gem as my base. Here is a side note. I read about a lot of people having problem with foil. First, we test our foil before shipping by using a piece of Scotch Tape on the backside. Rub the tape on the backing and pull-off. If the foil comes off-it is a good roll.  Secondly, I use Wundasize and never have problems with this size.  Usually it is one of two problems.  The base you are working on is absorbent or the base is stippled and not truly flat. This happens a lot when paint is applied with a heavy hand or a lamb's wool roller.

If you roll your size and come back an hour later and can't feel it-then your surface is absorbing the product.  If you feel the size and scrub your foil, but the piece looks hazy when you pull it -the walls are stippled and the foil is catching the upper part of the texture.

That is why I like to foil on Venetian Plaster. I trowel one coat (gentle trowel lines are fine) to get a nice opaque well sealed surface to work on. Compare the cost of 1 gallon of Venetian Gem and going around the room once for a base to rolling two coats of foil size and applying multiple layers of foil.

OK-Where were we?

Trowel a layer of Venetian Gem Chamois (a pale butter color) in a section. While this section is wet, press a thin trash bag or piece of plastic into the plaster.  Repeat across your wall working in manageable sections.


This creates the lines that you see in Ostrich Skin.  Go to a local Western Wear or Tractor Supply Store and check out the cowboy/girl boots. You will see the folds.

Let the Chamois Plaster dry at least an hour.

Next, put some Wundasize in a paint bin and roll your Spot Roller in the bin to coat the surface. Shake or tape the roller over the bin to remove the excess size.  Roll this over the dry plaster a few times. I find that I may roll about 3 times before I need to drip the roller again.  I went a little spot crazy on this sample-most Ostrich Skins don't have this many spots! Some spots will be more distinct then others and That Is OK-we are talking nature here.


As I work, I use a cloth to wipe the excess Wunda off the roller. To clean the roller use cold water. I soaked my roller in cold water and Windex. The size turned white on the roller and I peeled it off-I like to peel sunburns so I didn't mind that so much.  The key is not to let the roller sit in the Wundasize all day. Both the Wunda and the roller will get gloppy.

Let the spots set up at least an hour. I used our Toasted Bronze Foil for my spots. Cut a piece of foil and place it over the spots with the Bronze color facing you and scrub with a stiff bristle scrubbing brush.


Cover all the spots.  Mine looks like a hybrid Cheetah and Ostrich-A Cheetrich!


I bet Dr. Mephisto from South Park knows about the Cheetrich!

I mixed a glaze of 3 parts FX Thinner + 1 part American Walnut Stain & Seal + 1 part Rich Brown Stain & Seal. Brush this over the surface and soften with a cloth.


To really pop the finish I rolled C500 Gloss when the glaze was dry but this is not a necessary step. The FX Thinner and stain mix is strong enough to protect the finish in most rooms.


Later this week we will add to our sample menagerie.


Don't look so smug there little fella!


Friday, May 18, 2012

Roll with It: DIY Hammered Metal Finish

See Spot Roll

Howdy! I am so glad to be off bed rest and back at work. Hope my doctor doesn't see this. But how could I take it easy when THE ROLLERS FINALLY ARRIVED.  After months of testing and negotiations (and learning the translation app), we have all 6 of our new specialty rollers.

Alligator

Bark

Loops
Threads

Patchwork


And the Spot Roller. Let's play with this one first.  I started on Royal Taupe Setcoat but any dark Setcoat will work.  I buttered my steel blade and troweled a high/low coat of Palette Deco Bronze. This is pre-tinted metallic plaster. Don't over work the Palette Deco as it will set up. Trowel lines don't matter because you are about to roll through it.  Work in 3' x 3' areas.

By the way, Coral is the hot color for summer!


While the plaster is wet, roll through with the Spots Specialty Roller.  Don't push too hard or you will smear the pattern.  I roll the pattern every which way so lapping the spots is not an issue.  You can roll about 3 sections and then you will need to wipe the roller with a damp cloth.


This roller does not come with a handle. I like these little stub cages that you can get at Home Improvement stores.

The roller is 7 inches long and while it is a very sturdy rubber it may be cut with a hack saw. I keep one full size and cut one to the size of the stub roller. This gives me two pieces to use in narrow/tight spaces.

When the Palette Deco layer is dry-this takes about an hour-glaze the finish.  I mixed 3 parts FX Thinner with 1 part Antique Cherry Stain and Seal. Brush this 100% over the surface and pad with a dry cloth.

After I've applied the stain to my area, I like to use a foam brush to pull some of the stain off the tips of the pattern.  A rubber trowel would also work.

And that is it! Super Easy Finish.  This would work for a ceiling, range hood, or furniture piece.  Change up the Palette Deco Bronze for Copper or Gold.  Or try Palette Deco Pearl or Palette Deco Silver with a dark brown glaze on top.

The Molten Finish.  The Spot Roller is $18.95 and will work for both negative applications (demonstrated here) and positive applications which I will show in the next post. If you would like to try the rollers yourself, please call Bruce at 913-888-9996. You know how much Bruce likes to collect orders.