That's Good In-Faux
The question this Friday comes from my friend Phyllis who asked about creating a copper-look counter top over an old surface. You know what that means....

But first here are some things to think about before tackling an unconventional faux project.
- How much is the surface used? Is this a kitchen countertop that gets cleaned everyday or a guest bath used a few times a year?
- Is the condition of the surface damaged from a structural or water problem? You are just using paint not a magic wand. These things should be fixed by the appropriate professional first
- What is the material? Plastic, acrylic, wood, metal, and ceramic have different properties.
- What is the client's expectation? If they are expecting granite like qualities-they should get granite.
- All products need time to cure. That means 48 hours for a light cure such as setting things back on the surface, 72 hours for water clean-up and 30 days for heavy cleaning. Many people will disregard those time frames if the surface is one they use frequently like a kitchen counter.
- Dry times between layers are critical. It may only take you 20 minutes to apply a layer but you can not come back until the next day. Plan on multiple trips even for a small surface.
Still interested in doing a countertop? OK, let's get started....

Our countertop is wood. Wood is good. It is an easier surface to work on because it is porous.
To prepare a wood surface, you need to clean it with a degreaser/de-glosser like Krud Kutter, TSP, or Paso. We prefer Paso or granular TSP (mixed with water). These products are brushed or wiped on and allowed to sit for 30 minutes. Then use a 220-320 grit sandpaper to scuff the surface and remove loose topcoat/debris. Clean the sanding dust and other smutz with a damp cloth. Give the surface at least an hour for the liquid to evaporate.
If the surface is non-porous like cultured marble, after the above steps, you will need to apply a bonding primer. In the Faux Effects line, I either use Primetch or Stone Décor. Primetch is a silver label product and is as sticky bonding agent. Roll on a coat with a black foam roller and it will tack-up. When it is no longer stick, you may roll a Setcoat color. Stone Décor is gold label and involves training.
I let the Setcoat layer dry over night whether I use Primetch, Stone Décor, Primer, or go directly to Setcoat. I used Royal Taupe Setcoat on our wood counter.

These are the products I used for this simple technique. I opted not to use the large Mica Flakes as I progressed with the project. The Activator II is the only Gold Label project. If you don't have access to it, then substitute denatured alcohol for a similar effect.

Materials:
Faux Effects Royal Taupe Setcoat
Faux Effects Charred Gold Lusterstone and Weathered Bronze Lusterstone
Faux Effects Metallic Copper and Metallic Rich Gold Concentrate
Magic Metals Aqua Blue Patina Solution
Faux Effects Activator II or Denatured Alcohol
Infinity Laser Cut Antique Gold Glitter
Faux Effects Aquaguard Gloss
Faux Effects C-500 Satin
Water bottle
Chip Brushes
Pointed Glazing Brush
Small bowls or ramekins
Black Foam Roller
Sanding block and/or papers
Don't have what you need? Don't worry we carry it.

Of Course!
I'm using Charred Gold and Weathered Bronze Lusterstone but any color complimentary to copper will work. Spritz the surface with water and dab in one of the Lusterstone colors.

There should be enough water for you to swirl the brush and make the Lusterstone frothy.

Repeat with the 2nd Lusterstone color. While the Lusterstone is wet, squirt in some Metallic Copper Concentrate and some Rich Gold Metallic Concentrate.

Spritz with more water....

And use a brush to break up the shapes.

The final step in the sequence is to flick the wet materials with the Activator II for small pits or denatured alcohol for larger holes.

It seems like a lot of operations to perform in a step but really after you try it a few times, you develop a rhythm. Spritz, swish, and flick....

Just work in small connecting sections.

Once a section is done, spritz with some Aqua Blue Patina Solution. The reaction does not happen right away but must be done while the copper and gold is damp.

This layer should dry overnight. The next day, us a medium to fine grit sanding block. This will smooth the surface and check for bonding. Wipe off the dust.
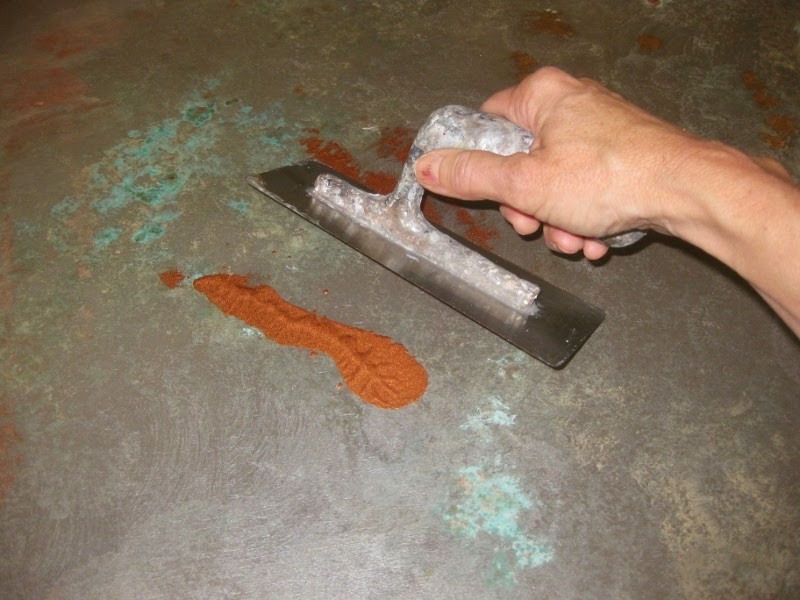
Butter your blade your more of the copper and/or gold metallic concentrate.

Pop this on in areas where you would like to see more metallic.


I know, boring right?
This layer needs to dry over night. The next day, sand again and seal. I like 1-2 coats of Aquaguard Gloss followed by 1 coat of C-500 Satin. The gloss coats should dry 2 hours between applications.


(Clueless, Paramount Pictures. 1995)
For anyone considering new countertops, I highly recommend Countertop Professionals in California.
ReplyDelete